Unity Prefabs
After working more than a year with unity, I decided to write down my takeaways from Unity prefabs system.
First things first, use prefabs for everything. This makes it easy to work on parts of the scene without conflicting with each other’s change(s). If two developers change the scene at the same time, there is no way to merge the changes automatically (in a safe way). So working with prefabs makes it easier to make changes that don’t require the scene to change.
Unity does not support nested prefabs. If you have two prefabs A and B, and you want to create another prefab C which contains A and B as children, Unity will consider C as a completely different prefab. Which means, if you make changes to prefabs A or B, your modifications will not be propagated to prefab C. There are third party tools that extend the unity editor and add nested prefab support but I have not used any of them. Just search for “nested prefab” in the Unity Asset Store to list available third party tools.
Link prefabs to prefabs, do no link instances to prefabs. I’ll try to explain this with an example.

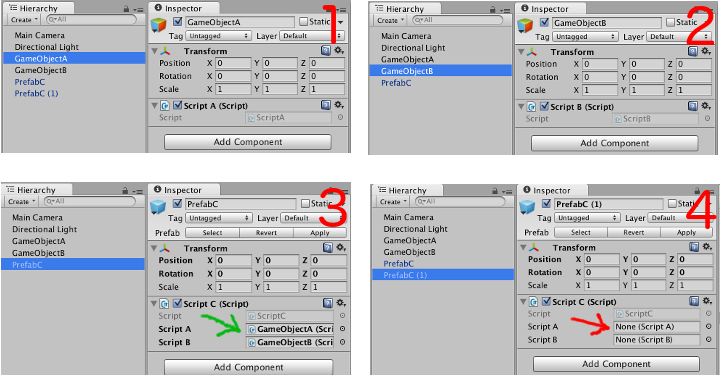
Picture above contains 4 different screenshots of hieararchy and the inspector view of the unity editor.
- GameOjectA has ScriptA as a script component.
- GameOjectB has ScriptB as a script component.
- ScriptC has two public fields, ScriptA and ScriptB. ScriptC is attached to PrefabC. We can satisfy the links with GameObjectA and GameObjectB instances as shown in figure 3.
- After applying changes to PrefabC, if you instantiate a new instance of PrefabC (as seen in figure 4), the links to GameObjectA and GameObjectB will be gone.
So I repeat, link prefabs to prefabs, do no link instances to prefabs.
I am going to add more tips as I master the Unity prefabs. If you have other useful facts about prefabs please feel free to drop a comment.